Skip to content
Commerce7 for WordPress
  • Home
  • Pricing
  • Documentation
Commerce7 for WordPress

Initial Setup

3
  • Installation
  • Configuration
  • Required Pages

Usage

3
  • Gutenberg Blocks
  • Custom Elements and Shortcodes
  • Linking to Products and Collections

Customization

2
  • Redirect Empty Pages
  • Style the floating cart
View Categories

Installation

Installation of the Commerce7 for WordPress plugin couldn’t be easier.

First, ensure you’re running WordPress and have already created an account on Commerce7. We also recommend you host your website on a modern, fast, and stable provider.

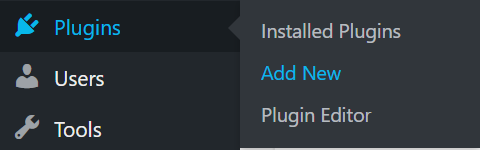
Next, log in to your website’s admin area. In the left menu bar, hover over Plugins and click “Add New”.

WordPress admin menu to add a new plugin

In the search bar in the top right, type Commerce7 for WordPress.

WordPress plugin search field showing the Commerce7 for WordPress text

When the results appear, click the “Install Now” button.

Commerce7 for WordPress plugin listing showing the install button

Then press “Activate”.

Commerce7 for WordPress plugin listing showing the activate button

That’s it! Commerce7 for WordPress is now installed and active on your website.

Updated on January 4, 2023
Configuration
Commerce7 for WordPress

© 2019 - 2025 URSA6 & 5forests. This website and associated plugins are not built by Commerce7. The Commerce7 trademark is used with permission by Commerce7 Platform Inc.

  • Home
  • Pricing
  • Documentation